Last updated on February 15th, 2024 at 01:04 am
Want to make your own apartment compost? Composting, I believe, is the most powerful part of your zero waste kitchen. It’s the returning to the earth of what you took from it, and you can do it right from your own home. And it’s not like you need a lot of space. Anyone can learn how to compost in an apartment without worms; it just takes some practice and getting used to.
I was super overwhelmed by composting when I first came across it and wanted to learn more. What is composting? What the heck is all the green stuff and brown stuff? Can I compost without worms? And how on earth do you open the bucket every day to feed in your daily scraps without unleashing the smell?!
Now, several months later (it has been two years, maybe?), I think I’ve figured it out. It took me this long not because it’s difficult (far from it – gardening and related activities are super simple. Not easy, simple.), but because I didn’t have any time to figure my way out through it.
The most important lesson I learnt? To just start.
I was waiting and waiting to learn everything before I started my compost bin. That day never came (and still hasn’t). But once you start, you learn. And composting is all about learning by doing. And once you start doing, you learn pretty quickly.
So, just start your compost bin. What’s the worst that could happen? You stink up your place? You unleash worms and maggots? (oh, yeah, that can be quite disgusting).
But, don’t worry. This composting guide for beginners will allow you to avoid those worst-case scenarios and just forge ahead with making that sweet-smelling, chocolate cake-resembling compost in three months.
Let’s get started.
Why Should You Compost in Your Apartment?

We’ve covered this before in our post on wormless composting for a zero waste kitchen, but just to quickly recap:
1 // To Reduce Your Carbon Footprint
Every year, the average household generates over 200 pounds of kitchen waste. Organic scraps fill our landfills, and it’s difficult for them to decompose there. As a result, 16% of methane emissions are from un-decomposed organic waste in our landfills. So we need to try to stop sending organic stuff to our landfills in the first place.
As a result, you reduce your carbon footprint by composting at home.
2 // To Feed Your Plants
Composting can be an endless source of rich, nutrient-filled material for the plants in your home garden to munch on.
3 // To Dispose of Your Waste Responsibly
If you want to aim for a zero waste kitchen, composting essentially is the catch-all waste processing zone for that. You’ve minimized plastic, and any paper you have used can be added to the compost bin. So what will you be throwing out from your kitchen, then, on a daily basis? Hopefully, nothing! (Nothing – if you’re a vegan. Vegetarians and meat eaters, however, will be throwing out dairy products, bones, etc. – which are not compostable in our kitchens.)
THIS POST MAY CONTAIN AFFILIATE LINKS. PLEASE READ MY DISCLOSURE FOR MORE DETAILS.
How Does Composting Work?
Composting is simple. This is the basic process:
MIXING BROWN AND GREEN
1 / Green Stuff
Collect your kitchen waste of the day (veggie scraps, coffee grounds, tea leaves and tea bags, bread, rotten food, etc). This is the GREEN stuff – rich in nitrogen and contains more moisture
2 / Brown Stuff
You also need dry leaves, newspaper shreds, cardboard, twigs, sawdust, etc. This is the BROWN stuff – rich in carbon and contains less moisture
3 / Mix Together
Mix the green stuff and the brown stuff to start the process. What’s the ratio for mixing green and brown?
The general rule of thumb is to go for three times as much brown as green. So for one portion of green stuff, you will need to add 3 portions of brown stuff.
4 / Keep the Mixture Moist
The mix needs to stay moist – but not wet. If it seems too wet, add in more browns. If it seems too dry, add in more greens.
5 / Be Patient & ‘Turn’ Regularly
Stop adding stuff when the container gets full. Keep it aside, and let it work its magic. You will need to mix this regularly. You will need to “turn” (i.e. mix properly) this mix once a week for the first month.
Then, turn it once a month until it’s done – which usually takes about three to six months (for a small compost bin).
6 / Check If It’s Done
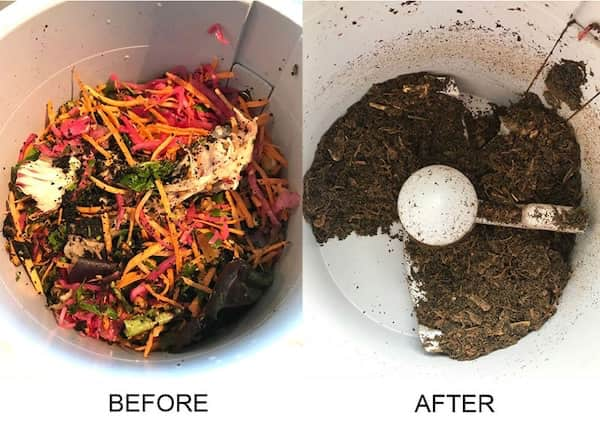
How can you tell when it’s done? Well, it becomes a crumbly, chocolate cake-resembling mass – and smells like freshly watered earth.
I know that description is a bit vague, so, to be more precise, the compost pile should have reduced to about half the original volume, and also returned to ambient temperature (the compost mix is usually warmer than the air temperature when the process is ongoing – the microorganisms are having a hot party in there!), and the mix should look like soil, and not like an ugly mess of constituent ingredients (such as veggie scraps, newspaper shreds, etc).
So what does compost look like when it’s ready? Like this:
The Science of Composting
A few points, once you’ve digested the basic process explained above:
- The essential ingredients for a successful decomposition are:
> nitrogen-rich materials (greens)
> carbon-rich materials (browns)
> oxygen (this is an aerobic process)
> water
> heat
2. Microorganisms eat the organic matter we’ve put in, and turn it into inorganic matter. During this process, they also release nutrients in a form that plants can absorb.
3. The microorganisms include bacteria, actinomycetes, fungi and protozoa.
4. This process occurs naturally in nature (heh), and is how rich soils are made. If you’ve seen forest floors, they’re basically a vast compost bin. Organic matter is constantly being added from the plants and trees above, which gets broken down by the microorganisms, and then used again by the vegetation for nutrition. And so on, ad infinitum.
How to Start Your Apartment Compost Without Worms

For apartments (and other smaller living spaces), the best bet is to go for a compost bin. This can be as simple a set-up as a plastic bucket with holes poked in the sides for air flow – to as complex as the Food Cycler (it’s just complex as a contraption; it’s ridiculously easy to use).
Check out our post on some awesome Kitchen Compost Bins. You can get one of them and easily begin your composting adventure.
If you’re going with the basic set-up, the following steps are what you need to do.
1 / Composting in Your Apartment with a 5 Gallon Bucket
- Use a 5-gallon (~20 litre) bucket, and get a snug-fitting lid for it.
- Drill about 10 holes in the bottom of the bucket (the base), about 10 holes in the lid, and 5 to 8 holes around the side at various heights. These holes are to allow air flow inside and out.
- Sometimes, the holes at the bottom get clogged by the compost material. To prevent this, place twigs and sticks across the bottom of the bucket – they will act as a net to prevent clogging of the drain holes.
- Start dumping the green and brown stuff in a 1:3 ratio daily, as mentioned above. Keep the bin covered with the lid at all times.
- The ideal method is to drop some browns in first, add some greens, and then browns again, and so on. Add them in alternating layers, while maintaining the ratio.
- ‘Turn’ the mixture once a week, i.e. mix it thoroughly so that it gets more homogeneous and there’s sufficient air flow for the magic to happen.
(If the bucket is cylindrical, you can also roll it on the ground for the contents to mix together without you having to open it and mix it with a stick or your (gloved) hand.) - Continue the daily routine of adding greens and browns until the bin gets full. Close the lid and keep it aside.
- Start a new 5-gallon bucket/bin. Follow the same steps from number 1 above.
- Meanwhile, the contents of the first bucket are decomposing away. Make sure you open it once a month and mix it up to kind of prod it along. Check on how it’s progressing. You’ll find the initial materials ‘reducing’ in quantity and soil increasing. The microorganisms are slowly converting the raw materials that you put in into compost.
- Once the compost is ready, use it!
If a 5-gallon bucket is too large for you, you could always scale down for your in-kitchen composter by using a smaller container and lid (like this pretty one). The principles stay the same.
THIS POST CONTAINS AFFILIATE LINKS. PLEASE READ MY DISCLOSURE FOR MORE DETAILS.
2 / Bokashi Composting
To just briefly explain, bokashi is an anaerobic fermenting of organic material, in which you keep your organic waste in an airtight container. To this, you add a bokashi bran, and drain off the liquid every few days (this liquid can be used as a nutritious supplement for plants!).
Fermentation takes place, and then the final resulting mixture is ready to be composted. Note: Bokashi doesn’t directly compost the organic waste; it’s a step prior to composting that simply speeds up the breakdown of your organic waste. You’ll have to add this bokashi-fermented mixture into your compost bin for composting.
Anyone Can Compost!
Remember, you can compost even if you haven’t yet started your garden, or don’t even plan to have a garden. You’re making something extremely useful out of waste (that too with very little effort). That’s so amazing. So don’t let the absence of a balcony garden discourage you from composting your food scraps. But what to do with compost if you don’t garden? You can still make that sweet-smelling compost and then gift it to your neighbors, friends, or the local farmers market or gardener’s store. It’s precious, and whoever takes it will be very grateful! Get more ideas here for your compost.
And, you get to help the earth.
Wondering where and how to compost in adherence to local regulations? Check out Litterless’s comprehensive list for the US.
If you liked this post, please spread the love and share it around:) Thank you<3

THIS POST MAY CONTAIN AFFILIATE LINKS. PLEASE READ MY DISCLOSURE FOR MORE DETAILS.

Leave a Reply